1. What is API
If you haven’t worked with API, there is a cool example. Let’s compare API with a waiter who serves customers with a menu and then transfers the customers’ order to the kitchen. The waiter checks the order is on the menu, delivers it to the kitchen, and serves it back. In the case of software, this function is performed by API.
API (Application programming interface) is a communication interface between two independent software components.
It maintains communication between provider and client. There is a certain API provider in the software that provides some services and there is a client (consumer) who wants to use these services. The client sends the request to the services provider, and the provider sends the response to the client. This communication goes under a contract that describes how you can contact the provider and what kind of responses the provider can send. Such a two-way relationship.

1.1. API Classification
If we look at the API classification, we’ll discover a lot of different types, e.g. web service, library-based, class-based, object remoting APIs, etc.
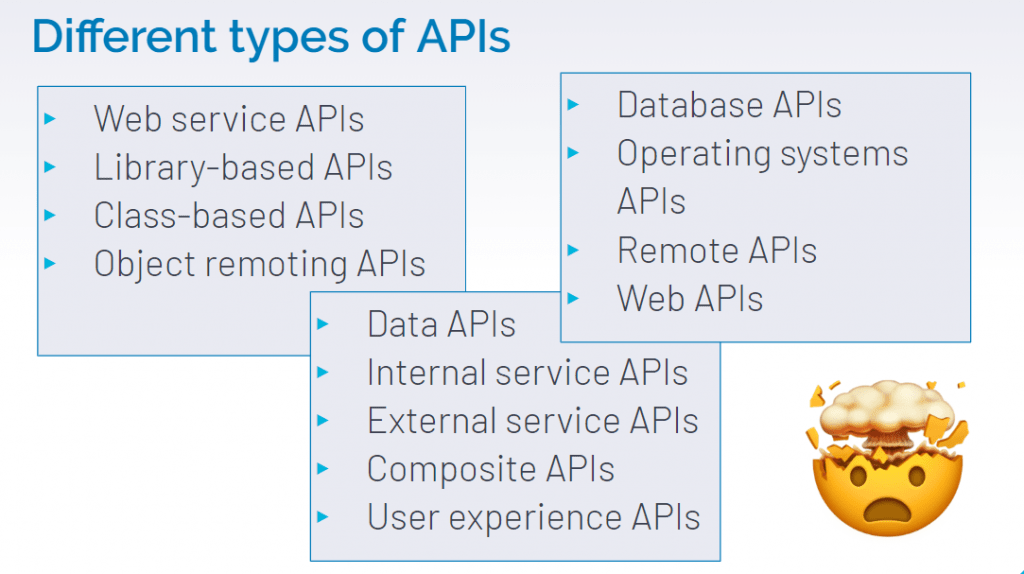
I’d like to dwell on the classification by the type of release policy. As for me, this classification allows you to mark out hidden risks. We can outline three types of API according to release policies classification: open (public), partner, and internal (private).
Everybody can use open APIs. They are publicly available on the Internet and can be used without or with limited restrictions. For example, Google Maps has a public API. To use partners API you need to agree with the company that provides it. This API is also the final product for this company. The hidden risks I told you about are connected with the internal API. When API isn’t the final product of the company, and it is used only for internal use. For example, to provide communication between front-end and back-end on the web. Usually, many pitfalls can be hidden there because less attention is paid to this type.
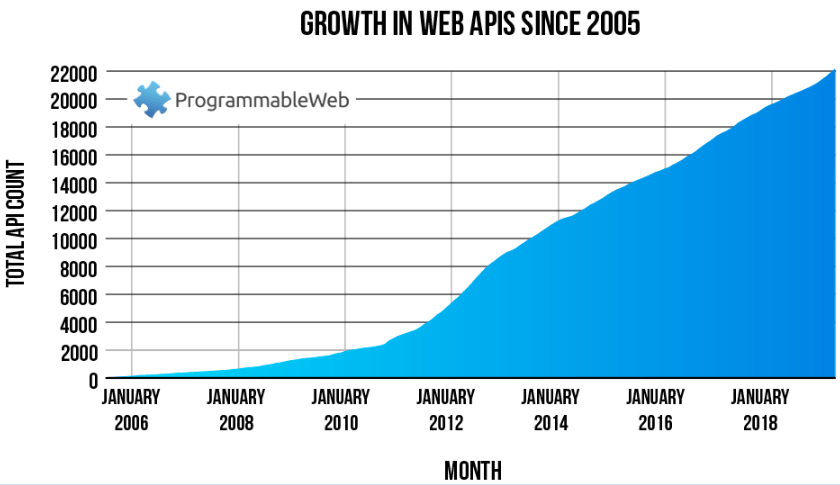
ProgrammableWeb collects statistics and all info about public APIs. It even includes the library with all public APIs. So according to it, since 2005 the number of them is growing. There are over 15,000 publicly available APIs. They are so used because they are easier to reuse in other projects. The growing popularity of API requires a structured approach for its testing.
1.2. API Technologies
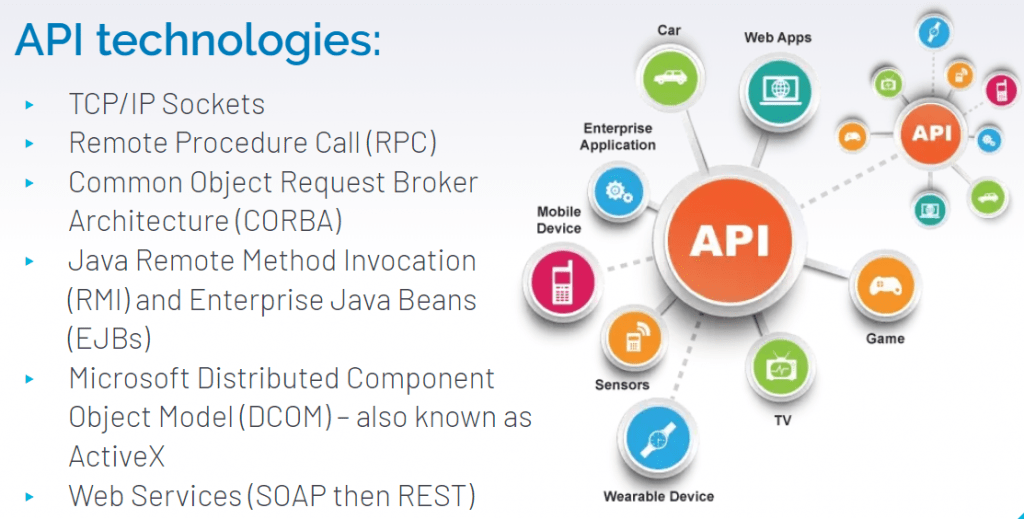
Many specialists are familiar with SOAP or REST APIs, but the API world is not limited to this. They can be used not only on the web. For example, a third-party programming library can also have its API. The communication with this library occurs via its API, the implementation is hidden and the documentation describes how communication occurs.
Now we’ll talk about the most commonly used REST APIs in web applications.
2. What is REST API
Roy Fielding introduced the term REST (Representational State Transfer) in 2000 in his dissertation. What was used before? Most often it was SOAP, XML-RPC, or JSON-RPC protocols, but there was no REST.
Unlike SOAP protocol, REST is an architectural style built on six constraints: uniform interface, client-server, stateless, cacheable, layered system, code on demand. These principles were designed to make a simple, reliable, and scalable application.
The first suggestion is a clear separation between the client-server. They should be isolated and not affect each other. If several APIs are used in the application, they should have unified principles for building API interfaces, including one logical URL, request and response structures, etc.
Stateless means that the server shouldn’t store client information. Every time the client requests the server, this request should contain everything necessary to be accepted by the server. The session state is completely saved on the client. A resource caching is preferable. A cached resource should inform the client about this, usually, it’s done with request headers. The system should consist of layers, they are superimposed, and don’t know what is happening outside the level they’re interacting.
Code on demand is limited to the client’s needs. For example, we don’t download everything on a web page at once, but only what the user requests. So APIs should fulfill exactly those functions the client requested. No more, no less.
To sum up, a REST API is a web API implemented over HTTP protocol using REST principles.
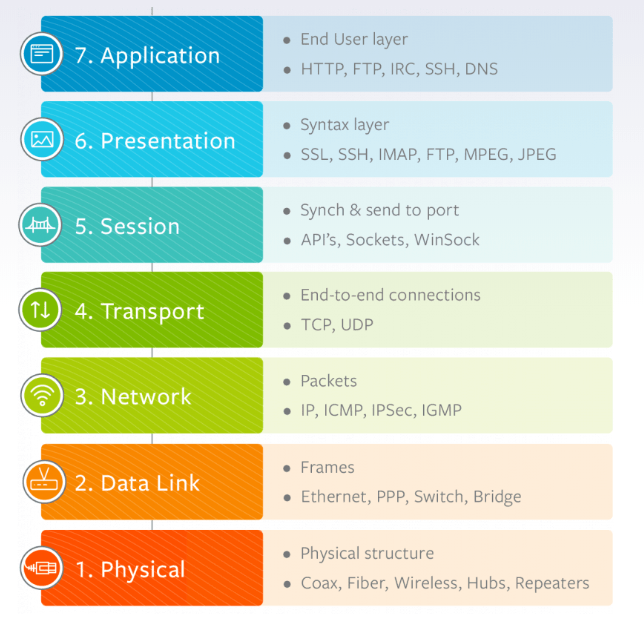
According to the OSI API model, the REST API works at the highest level, on top of the HTTP protocol. If SOAP can use other protocols, REST can use only HTTP.
Let’s take the client’s communication with the web application as an example. When a user opens an authorization page, he enters his login, password, and presses a button. The API request is sent via the Internet to a remote server. Then a request is performed at the database level to find the user. If a user is found, the server sends a successful response to the API and the user can log in. If you look from the HTTP side, then API requests are transformed into HTTP requests and processed on the server-side.
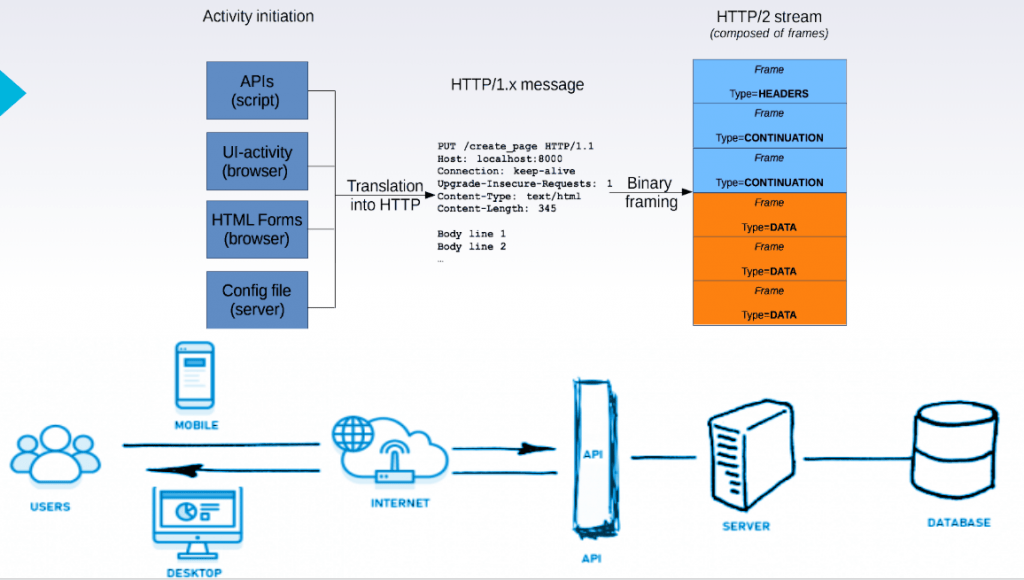
You can see an API request for a registration process in the example below.
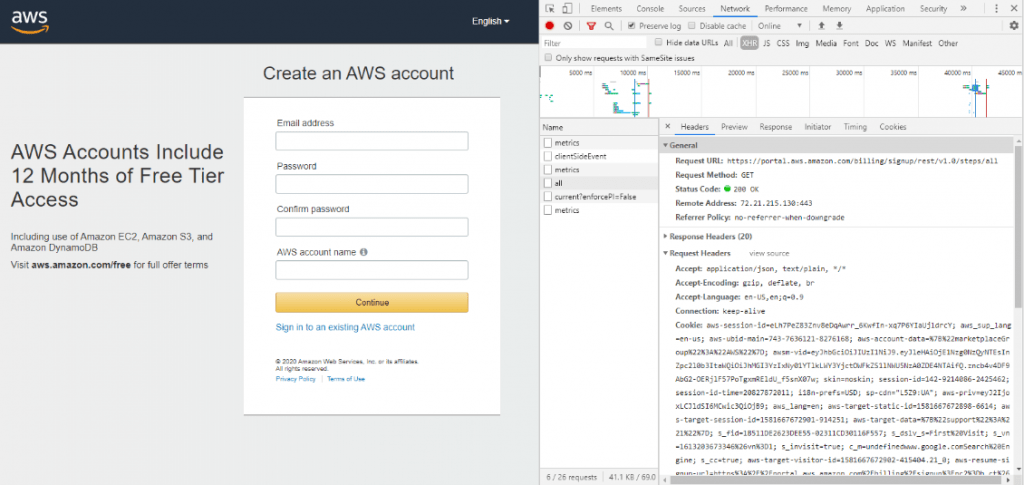
The view of the API request in the browser via Network tab in Developer tools
2.1. HTTP Requests Structure
REST API is an HTTP add-on that works completely according to this protocol, so you need to understand requests and responses structure. According to the HTTP documentation, it includes a start line, a set of headers, and a body.

You can see the same structure in the browser.
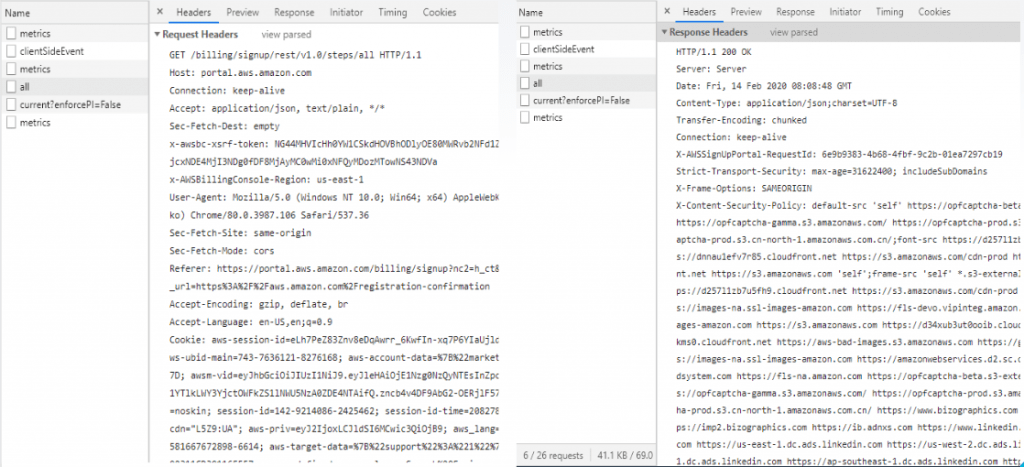
But when you start testing, you see another structure. For example, you open a Postman application and don’t see the lines described in the HTTP documentation.
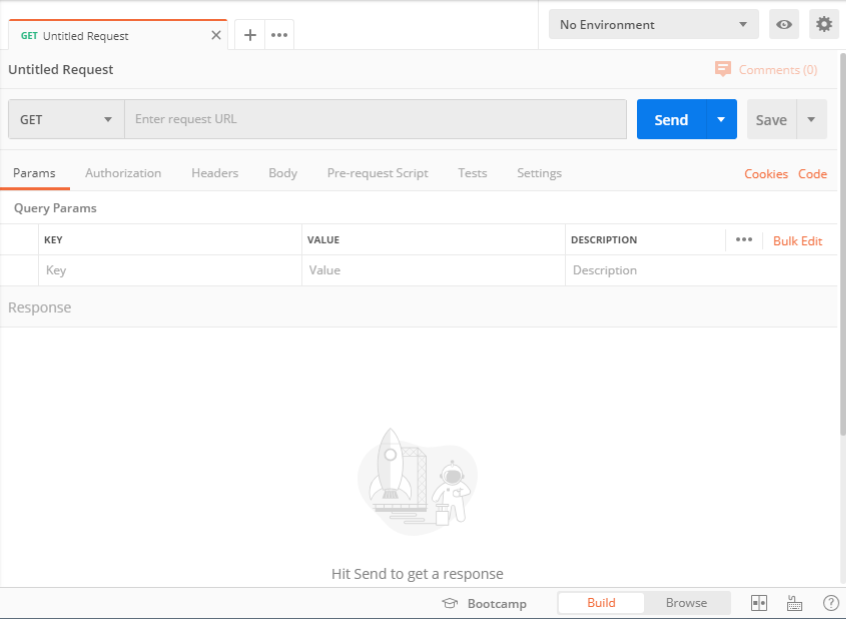
So I want to look at the requests and responses from the manual testing point of view, but in fact, it is also useful for automated testing.
Using the previous example, we can highlight the structure of the HTTP request. It consists of 5 points:
- HTTP method
- target (URL)
- parameters (optional)
- headers
- body (optional depending on the method).
2.1.1. HTTP methods
The HTTP protocol has a lot of methods. The most frequently used are GET, POST, PUT, and DELETE. PATCH and OPTIONS are rarer.

Keep in mind that all these HTTP methods are related to the invoked actions on the backend level and the operations with records in the database. So the GET method is used for retrieving the info. It should invoke a SELECT query execution on the database level. A POST method should be used for creating a new record on the API level and invoking the INSERT query at the database level. PUT and PATCH methods are used for updating existing records. The PUT method should update the entire model, the entire object. The PATCH method updates partially, so this is an UPDATE query at the database level. The DELETE method should be used for removing existing records. It should invoke a DELETE query on the database level. If you open any tool for sending requests, you will see more of them. In testing, use what you have on the project.
2.1.2. Target and Parameters

The path is where we send the request. The API can be hosted not only on the default HTTP or HTTPS port (80/443), it can be on another port. So you have to specify the port you are sending requests to. Next is the service root. There might be several endpoints (resource paths) within one API. Next is a set of parameters, most often there are used with GET, DELETE, PUT requests.
GET request ignores the request body, but the data could be sent within the request parameter. In this case, the potential quantity of the parameters should be considered as URL length. And it has limits in browsers.
We had such a case in our project when the GET request fell in the browser because we had a lot of parameters and they didn’t fit the max URL length limitation. So think about how many parameters you might use in your path. If there are a lot of them, it is better to use a POST request. The body of the request doesn’t have such limits as the URL.
2.1.3. Headers
We can divide headers into standard and non-standard.
Standard:
- Content-type
- Content-length
- Cookie
- Authorization
- User-agent
- Host, etc.
Non-standard:
- X-requested-with
- X-forwarded-host
- X-request-id, etc.
Standard headers are commonly used in HTTP. Non-standard ones are additional headers that can be used in the product to provide more information.
We had several microservices that worked separately from each other. The first service retrieved the client’s request, then extended the request with some additional information (basically, added headers) and sent it to the third which processed the request. To trace the entire movement path of this request, we used the X-Correlation-ID header with a unique GUID value. At the level of the first microservice, we extended the request with this header. So we could easily track the status of the operation through all microservices.
2.1.4. Body
The body contains data associated with the request or response. It’s the main info you transfer to the server or retrieve it back. The presence of the body and its size is specified by method and HTTP headers. When you submit a request, the HTTP header needs to know what data you transmit in the body. Because when the server receives data, it doesn’t parse the body and can’t see the format. It receives this information from the ‘Content-type’ header. If the server sees that the content type is appropriate, the server processes the request.
The following data formats can be sent in the body through REST API: Comma Separated Value (CSV), JavaScript Object Notation (JSON), Really Simple Syndication (RSS), etc.
2.2. HTTP Response Structure
Here I gathered the most common HTTP response structure for testing purposes:
- Status Code
- Headers
- Body (optional)
We checked out the headers and body, so let’s move to the standard status codes. Tap on a link to read the official documentation. According to a higher level, these are 5 classes:
- 1xx – informational
- 2xx – success
- 3xx – redirection
- 4xx – client error
- 5xx – server error
2.3. Best Practices for REST API
We have already figured out a bit about what REST API is. So it’s not a protocol or a strictly typed one. Here we’ll dwell on the best practices for REST API development and testing. We are trying to follow them on our projects. I highlighted best practices for testers, there is much more for developers.
1. Nouns (plural or singular) for the endpoints.
You can unify the endpoints you refer to by using nouns and specify action type by the method.
If you use the verbs with nouns like ‘GetUser’, ‘CreateUser’, you create a huge number of endpoints. It’s more difficult to track and monitor all of them in the documentation. If you have 1 endpoint that you can refer to and use different methods, it greatly reduces and facilitates the understanding of the project.
2. Use correct methods and don’t allow unnecessary methods to users.
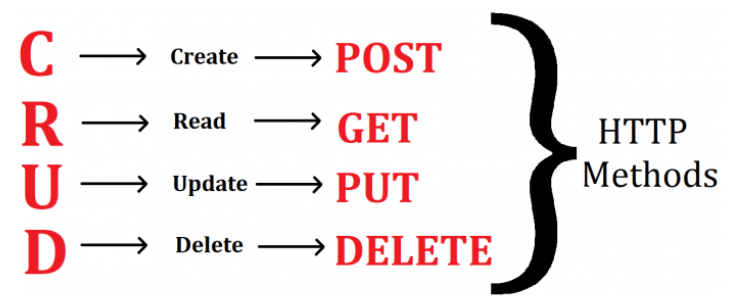 For example, if a user can only receive information from a given endpoint, don’t add in an API level POST or PUT methods with a thought about the future.
At first, give a minimum of permissions, and then if you need to add something else, you’ll add these features.
3. Use versioning in API.
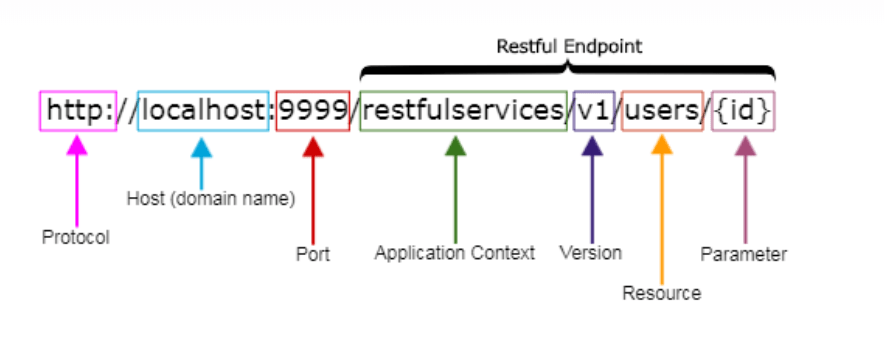 Versioning helps to introduce new changes with less impact on existing clients. For clients who already use your API, you can add breaking changes. To smooth the transition, use versioning. For example, a project may have API v.1, v.2, etc. And some customers can keep using v.1 while you have already released v.2. So you can give customers time to upgrade.
4. Use standard HTTP status codes.
REST API is built on top of the HTTP protocol, so it is better to use standard unified response status codes that all testers and developers will understand.
5. Validation on the API level.
In a good project, validation should be at 3 levels: on the frontend, backend, and database side. It’s easy to see on the frontend if you fill out the form with invalid data. It’s also easy to check on the database side because at least the script that creates the database tables can determine the accepted data type for each column and the length limitations. At the backend level, it’s more difficult. But you check it with API. It should react when you send invalid requests.
For example, you send a request to the URL that doesn’t exist on the server and it returns 404. Or you use an unexpected method and it returns 405. Or you send the request without the required fields in the body and it returns 400 status code.
6. Error handling and status response messages.
Error handling is about giving the correct HTTP status code and clear for the end-users response body. If the error occurred on the client-side, then this is one of the fourth class. If it occurs on the server-side, this is one of the fifth class. Indicate info that describes what happened in the body without using the stack trace. Stack traces are server info that can become a vulnerability for your project. All classes will be registered there and somebody will be able to understand how communication processes and to break something.
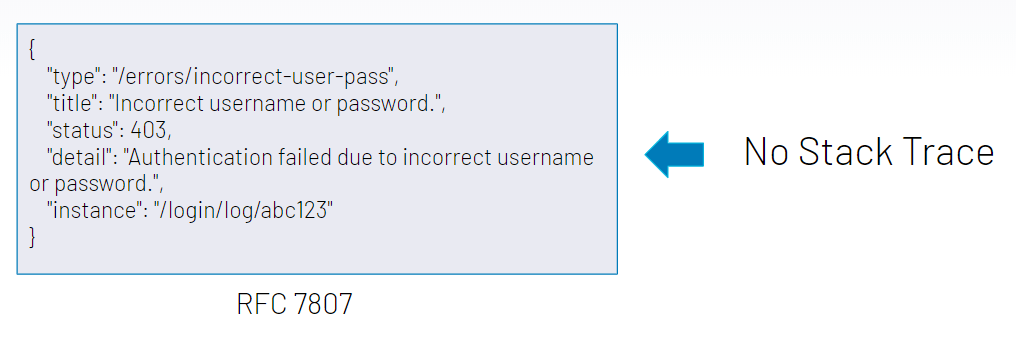
There is a standard about error handling that describes the ideal response structure. By the way, there is an error on the screenshot above, can you find it?
Correct answer: Error in the picture → wrong status code. 401 when there is no such user in the database or the password is not correct (failed authentication), 403 when the user is in the database but he doesn’t have permissions (failed authorization).
7. Considering security aspects.
Always keep in mind security. This is a must-have. Use secured HTTPS protocol, authorization, and authentication and beware of sensitive data. For example, if you use a JWT token for authorization on your project, you need to verify that it doesn’t contain any sensitive client data. Because the request could be intercepted and many online tools can parse the JWT token and see the stored info. The data transmitted in the parameters string, JWT token and so on needs to be transferred securely.
Also, from a security point of view, it’s good to limit the number of requests from a single host to protect your server from DDoS attacks.
8. Documentation.
It’s great when there is documentation on the project and you, as a tester, should pay attention to the fact that the API works, and that everything is documented as well. Swagger and Slate are commonly used and can come at handy for you.
3. REST API Testing
If we take a look at the software testing levels, API testing could be referred to as the integration level. For example, if we consider a web application, API is an interface. But in some cases, API could be an end product and testing on the API level could be considered as testing of the whole system (system level).
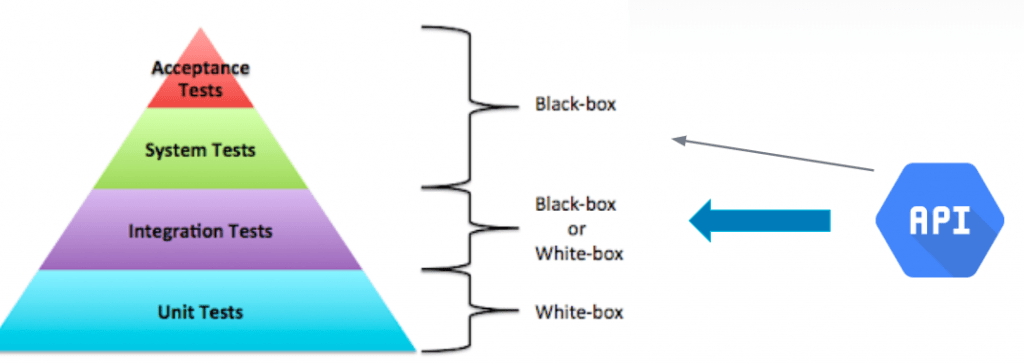
Let’s check out the advantages of API testing. For example, compared with testing from a web interface, API allows you to start testing earlier. Most often the backend is developed first, then the part of the API, and finally the frontend. Compared to testing through the UI, API tests are more beneficial from a financial point of view, because they’re faster to start.
API tests are faster than UI tests. For example, to generate a lot of users, even if you are testing through UI, it is much more convenient for you to do this by sending requests via the API.
Compared to unit tests, which are cheaper and can be started in the early stages, API tests allow reproducing end-users behavior in the early stages. Also, you can already check business logic and security aspects. You can try the SQL injections and check how the service is coping.
To sum up, there are API tests advantages:
- Earlier start
- Faster than a UI test
- Provide higher reliability covering an interface closer to the end-user
- Higher ROI
- Simplify the validation of business logic
- Simplify security
- Simplify compliance
- Easier to automate
If we talk about the stages of API testing, then they are no different from other testing objects.
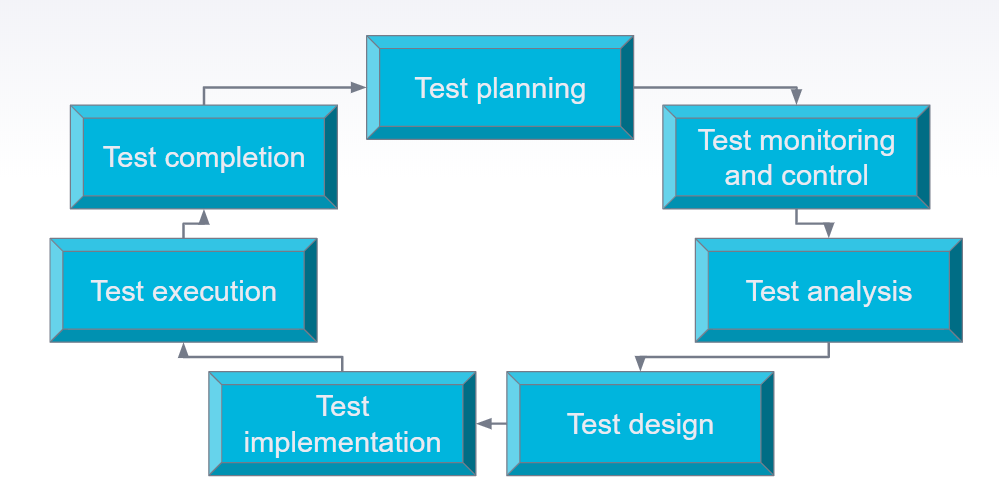
Types of API tests:
- Functional
- Non-functional
- Performance
- Security
- Documentation
- Etc
- Change-based
The functional type is used to check how the product works.
Non-functional types are used for testing under non-functional product characteristics such as performance, security, etc. API testing also includes change related testing, such as regression or confirmation.
3.1.Functional testing
Functional testing can be considered in terms of positive and negative test scenarios. We send valid data, then the server sends a successful response. And at the application level, we get the expected changes.
Also, you should keep in mind that functional testing involves error handling. You should make requests that aren’t expected from the service and check how such requests are handled. If for some reason the service cannot answer, for example, the database has crashed, you shouldn’t make the user wait. The server should give the correct report of what happened: there are problems on the server-side. Provide the appropriate error response status code and clear error message in the body.
Let’s wrap up, so functional testing:
- ensures that the implementation is working correctly as specified according to the specification or informal requirements:
- returns the expected output for a given valid input
- handles errors when the results are outside of the expected parameters
- includes Positive/Negative testing scenarios
3.2. API Performance Tests
API performance tests are the easiest to check the efficiency of the service. They ensure the API can handle the expected load and includes load, stress, endurance, volume tests, etc.
You can use free JMeter tools to send concurrent requests in several threads and different tools to measure the performance of the server. Performance testing on the API level ensures finding memory leak at the program level. When the process ends, resources should be released. A memory leak can occur if resources aren’t released after a process has been finished. If your server doesn’t have scalability, it’s crucial to release the resources and make sure that N requests won’t crash the server.
3.3. API Security Tests
Security tests are aimed to find vulnerabilities from external threats. Make sure that you don’t transmit sensitive information. For example, SQL injection can be quickly transmitted using API and the application could be checked for such vulnerability.
3.4. API Documentation Tests
Ensure that API documentation exists and contains a full, clear and uncontradictory description of API purpose, API targets (endpoints), API methods allowed, expected headers, valid body example, successful response code, and response body, and error handling examples.
3.5. Test Scenario Categories
I’ve highlighted the following scenarios for API testing. The first one is the basic positive tests (happy paths). It’s a basic set of minimally requested data that should contain your request. Then you should perform an extended positive test with optional parameters. For example, if there are non-required fields on the frontend, they’re still expected and make sure that they can be processed by API.
The third one is negative testing with valid inputs. For example, a user in the system must have a unique name. Try to add another user with the name that already exists. From the validation point of view, it will be correct, but the system should answer correctly that the user with such a name already exists. Negative testing with invalid input is when you try to enter invalid characters, unexpected data type or excessive amounts of data, etc. This can be checked on the API level because it should filter all invalid data.
Authorization and permission tests involve such scenarios when the user is not authenticated and the system returns 401, and when a user with no permission rights gets 403 response code. The final checks should include security, performance and documentation tests.
Make sure you perform such checks at the level of each test:
- verify correct HTTP status code,
- verify response payload (body),
- verify response headers, especially if you have special headers,
- verify basic performance, look at the time for the processing of your request,
- verify the correct application state. So you get not only correct response but successfully changed application state,
- verify basic security and make sure you don’t transmit any sensitive data.
4. API Testing Tools and Useful Links
The icing on the cake is the list of the useful tools and links that will make your API testing process more easy and productive. Choose the tools according to your aim and project.
- JMeter helps with performance tests.
- Postman is a collaboration platform for API testing.
- REST-assured is the library for Java to simplify writing autotests.
- RESTSharp is the library for C# to simplify writing autotests.
- Katalon helps you quickly generate automated cross-platform tests.
- Apigee is the cross-cloud API management platform.
- Tricentis is a platform for test automation.
- SoapUI can be helpful for SOAP API, REST API testing, and more.
You can practice API testing using public dummy APIs. Below you’ll find links to them.
Also, check out API University by ProgrammableWeb. It includes a lot of useful articles and resources.
Have a good time while testing REST APIs!

